Sunday, June 28, 2009

Making Inlaid Lava Beads With Polymer Clay

Black lava beads are cool, lightweight, great texture and classic basic black. One day I was looking at these beads and thought what if I ‘inlaid’ them with polymer clay to add color and dimension. So I gave it a try. After firing the beads I wondered how strong the polymer clay would hold to the lava beads. I took the finished beads and dropped them repeatedly onto a cement floor from a height of 8 feet. None of the polymer clay came out. The process is simple and changes the look of the lava beads. The process I outlined here is to create a turquoise look on the beads; of course any color or color combinations of your choosing can be used.

You will need:

Lava Beads

Polymer clay - turquoise, blue, green

Pallet knife or something similar

Oven

I begin by mixing three colors of polymer clay, turquoise, lapis blue and forest green. I do mix until completely blended, I mix until it has a marble look.

Select beads to be ‘inlaid’. Work a small amount of the color polymer clay you want to begin with between you fingers to soften. Push small amounts of the polymer clay into the holes in the lava beads. Using your pallet knife or similar tool to press, smooth and scrape the clay off the surface of the bead. Repeat this process around the beads until the desired amount of the bead is ‘inlaid’. I do not try to fill every whole in the bead, however this is completely up to you.


Slide ‘inlaid’ bead/s onto floral wire. When all beads are prepared and on the floral wire bend the ends of the floral wire creating a rack to keep the beads from touching the foil or baking sheet beneath them.

Fire the beads according to the manufactures directions for the polymer clay you are using. Allow the beads to cool. If you want a gloss finish on your beads spray them with a gloss sealant before taking them off the floral wire. Once cooled and dry your beads are ready to use.

Lava beads with and without the poly clay inlay are available in my Etsy shop Beadin Around The Block at BeadinAroundTheBlock.Etsy.com.


Saturday, June 27, 2009

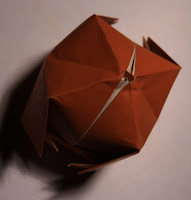
How to Make Origami Box Light Covers


We had a fun evening folding these simple box models that slip easily onto miniature lights. Just be careful not to put these on lights that get too hot.

Begin with a square sheet of paper - we were using the standard 150 mm x 150 mm, approx. 6" x 6"

1 – Fold square paper in half diagonally wrong sides together, unfold

2- Repeat diagonal fold creating crossing crease, remember wrong sides together unfold

3 - Fold paper in half wrong sides together, unfold reverse that fold so the paper is now wrong sides together.

4 - Bring fold corners together to the inside of the paper creating a triangle.

5 – Fold each point of the triangle up to the top point, turn over and repeat on other side.

6 – Orient model so the open end points away from you. Fold right and left corner to center. Turn

model over and repeat.

7 – Fold point at top out as shown, then fold back and tuck under flap. Repeat front and back on all 4 points.

8 – Blow into the hole at the top of box to inflate.

It didn't take long at all to fold a whole bunch of these models.

Monday, June 22, 2009

Turquoise


Turquoise is a relatively soft stone ranging in color from light sky blues to deep rich blues, blue greens and green. The color of turquoise is determined by the amount of copper (blue) verses iron (green) found in the stone. Turquoise is mined in many places throughout the world: southwest US, China, Iran, Afghanistan, Argentina, Brazil, Australia and Mexico to name a few. Experience with the stone and familiarity with the colors can help in identifying where the turquoise was mined. Around 80% of turquoise available today is mined in China and Tibet much of the remainder is mined in the US.

Turquoise is a problematic stone due to the number of dyed imitations, synthetics and treatments used on poor or low-grade turquoise to create a stone with a more valuable appearance. Additionally processes of grinding chalk turquoise and mixing with dye and resin to create reconstituted turquoise and out and out synthetic imitations in plastic and polymer clay. There is nothing wrong with any of the processes as long as the end product is sold with full disclosure. When dealing in finer turquoise I recommend using experience and your best judgment or that of someone trusted.

Stabilization of a softer turquoise stone that otherwise couldn’t be cut or polished is considered an acceptable practice, as long as the natural appearance of the stone is not altered. The majority of turquoise available today is stabilized. Lower grade, nearly colorless, turquoise is generally stabilized using dyed resins and therefore altering the natural look of the stone. This should be revealed by the dealer selling the stone, however may not be. Turquoise treated this way should be inexpensive. Next ‘lower’ quality of turquoise is a reconstituted mix of chalk turquoise mixed with dye and resin, this being the least desirable and basically a synthetic stone. Additionally stones containing no turquoise at all are sometimes dyed to look like turquoise, this is mainly done with Howlite. Beyond these are completely synthetic turquoise looking materials made from polymer clays, resins, plastics, etc. These can be easily identified with a heated pin or needle. When heated and applied to the material it will melt, unlike real turquoise.

The pieces in the photograph above are old Navajo. The top bracelet is set with Kingman turquoise, the middle bracelet is set with Sleeping Beauty turquoise, the bottom bracelet is set with turquoise mined in the Globe/Miami area of Arizona, USA. The photograph below is of a dyed howlite bead.

Friday, June 19, 2009

The Jade, Nephrite, Serpentine and Aventurine Confusion

I get a lot of questions regarding these stones. Rightfully so, there is much confusion due to marketing names, misrepresentations and misunderstandings. To begin with and hopefully not add too much to the confusion, there are two types of jade. Nephrite and jadeite, for centuries jadeite and nephrite were considered the same stones. With more modern techniques of identification differences between the two stones were found. Thus splitting the stones into the two categories. Both stones are available in a wide range of similar colors, off or grayish white to grey greens to green, browns and red browns. Jadeite jade is also found in emerald green (imperial jade) and pale purples. These last two colors considered more desirable and more expensive. In general the stronger and richer colors of these stones are found in jadeite form and creamier tones in the nephrite form. Only jadite is found in precious gem stone quality. The two photos below are carved jadite showing the variation in colors from nearly white to deep emerald green.

Telling the difference between the two stones is difficult. Jadeite is slightly harder than nephrite. This cannot be determined by looking or touching. A gemstone-testing device can be helpful, however if this is not available to you, knowing the stones origin can be a clue. Jadeite has been found in Burma, Canada, China, Japan, Guatemala, Kazakhstan, Siberia and the United States. Nephrite has been found in Australia, China, Brazil, Canada, Zimbabwe, Alaska and Poland. Below is a photo of Canadian nephrite below that Chinese nephrite.

Some marketing names I have encountered around the use of the name jade are:

· New Jade – a yellow translucent stone, this is serpentine

· Indian Jade – a green translucent to opaque stone, this is aventurine

· Wyoming Jade – nephrite

· Canadian Jade – nephrite

· African Jade - jasper

Below are photos of some of these stones. Top New Jade, 2nd down Aventurine, below that are two examples of serpentine and the bottom photo is African Jade.


Thursday, June 18, 2009

The Intention of Peace


Could giving the intention of peace through a hand folded origami peace dove ornament, or any other means, really change the world? Last fall an international intention experiment was put together by Lynne McTaggart (more information can be found at TheIntentionExperiment.com). This experiment was conducted over a week. Every day at the same time around the world people were asked to send intentions of peace to Sri Lanka. The energy I felt during participation in this experiment was palpable. Now after 25 years of civil war the fighting in Sri Lanka appears to be over... So what are the powers of our intentions? Visit Lynne's site to learn more about the research and experimentation regarding intentions.

The creation of the origami peace dove ornament began with a much larger idea. An installation of origami doves, each one folded from paper printed with a country flag of the world. Of course to pull this project off I would need to print my own paper with the images of the flags. As the process began I made the decision to include territory flags that were unique from their mother country. All in all there were just over 250 unique flags to print onto paper and to fold into doves. Using 2 different web sites I obtained downloads of all the flags. Once in the computer documents were created with each flag image, the image resized and then repeated across the sheet then printed. These sheets of paper were then cut into squares and folded into doves. This was no small task. The doves were then strung on long strands with beads ending with small globes. These doves measured about 4" in length. These were installed in Holy Click gallery, Phoenix, AZ in the spring of 2006. Subsequently I created a mobile with the origami doves being about 1.5" in length. Creating a smaller piece not needing nearly as much space to display(photo to right). After that the idea of folding origami doves from paper printed with all the flags on one sheet came about. I created this paper next and began producing these Peace Dove Ornaments. I have offered this item in my Etsy shop, QuietMind, for a year now and have had numerous orders. Several buyers requested the ornament be sent to an alternate party as a gift. Including a note or card on the buyers behalf. Then came the next turn in evolution of this product; now the buyer can select one of three card designs, have the card inscribed as they wish and the wrapped ornament with card sent as a gift any where in the world, thus giving the intention of peace.


Initial Post

Not being a writer by nature starting a blog has been a long time coming. In this blog I will be sharing my creative thoughts and ideas, techniques and inspirations, knowledge and discoveries, rants and raves and general thoughts. Oh and probably bird stories after all how could I help it.

Being a self-representing artist, jewelry designer and freethinker I view life differently than others, enjoying an unconventional life style, choosing to live on no set schedule, rather going by the rhythm of life. I sell my work on line on Etsy (see 'About Me' for shop name and web addresses) and through a variety of retail/galley venues. This means I have a VERY flexible schedule, can do much of my work from any location but also means I have to be self-motivated and disciplined. I 'work' more hours now than I did during my corporate incarnation; they are far more enjoyable hours now.

My posts will likely be short and sweet, I am usually not long on words but rather get to the point.